Everything You Need to Know About the Most Popular Cartilage Piercing
The helix piercing is the world’s most popular cartilage ear piercing. Ask anyone building a curated ear where they started, and most of them will say the helix. It is positioned on the outer rim of the upper ear, it accepts an extraordinary range of jewellery styles, and it sits visibly enough to be noticed without dominating the whole ear.
But the helix is also a cartilage piercing, which puts it in a fundamentally different category from a lobe. It heals more slowly, reacts more strongly to disturbance, and requires more patience from its owner. Understanding both the appeal and the commitment helps you get the most out of it.
This guide covers everything about the helix piercing: what it is, where exactly it sits, the different types, what the procedure involves, how long healing takes, how to care for it, and what jewellery works at every stage.
❝ The helix is the most common first cartilage piercing for a reason. It is in a relatively accessible position, heals well with consistent care, and is the visual anchor of almost every curated ear arrangement.
Where Is the Helix on the Ear?
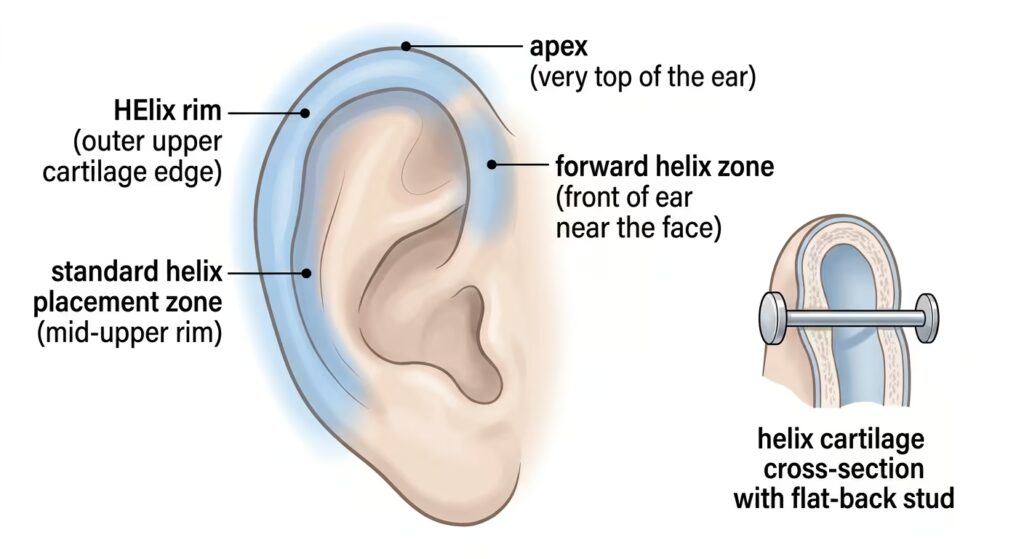
The helix is the outer rim of the ear. More specifically, it is the cartilage fold that runs along the upper and outer edge of the ear from the top down to where the rim curves inward. The helix is the visible edge that gives the ear its distinctive curved shape.
A helix piercing can be placed anywhere along this outer rim. The most common placement is on the upper portion of the outer rim. Lower placements sit closer to where the cartilage begins to curve back toward the head. Higher placements sit near the apex of the ear.
The helix is distinct from several other ear placements that are sometimes confused with it. The forward helix sits on the front of the ear close to the face, not on the outer rim. The rook sits in the inner fold above the daith. The conch sits in the concave bowl of the inner ear. All are cartilage piercings, but they are in different anatomical locations.
For a full guide to every ear piercing placement and how they compare, our article on types of ear piercings and pain levels covers the complete ear piercing landscape in detail.
Types of Helix Piercings
The helix is not a single fixed placement. Several distinct variations sit within the helix family, each with its own position on the ear and slightly different characteristics.
Standard helix
The standard helix piercing is placed anywhere along the outer upper rim of the ear. This is the most common cartilage piercing, with the most studied healing outcomes and the widest range of jewellery options of any cartilage placement.
The exact position within the standard helix zone is flexible. Some people prefer a mid-rim placement that sits prominently on the side profile. Others go higher toward the apex. The choice is largely aesthetic and depends on the shape of the individual ear and what looks best from the angles that matter to you.
Forward helix
The forward helix sits at the very front of the ear, where the helix curves inward toward the head, close to the face. The cartilage here is firmer and denser than the standard outer rim. It typically rates slightly higher on the pain scale and heals somewhat more slowly.
The forward helix is a striking placement because it is visible from the front of the face, unlike most ear piercings. One to three forward helix piercings stacked vertically at the front of the ear is a popular styling choice.
Double and triple helix
Double and triple helix piercings place two or three piercings along the same outer rim, creating a layered effect. They are almost always built sequentially rather than all at once, allowing each to heal before the next is added. Most piercers recommend at least three to four months between placements in the same area of cartilage.
| Type | Location | Pain (1-10) | Heal Time | Key Note |
| Standard Helix | Outer upper rim | 4–6 | 6–12 months | Most versatile cartilage piercing. |
| Forward Helix | Front rim near the face | 5–7 | 9–12 months | Visible from the front. Denser cartilage. |
| Double Helix | Two on the outer rim | 4–6 each | 6–12 months each | Best done one at a time. |
| Triple Helix | Three on the outer rim | 4–6 each | 6–12 months each | Build sequentially. High patience required. |
How Is a Helix Piercing Done?
A helix piercing is performed with a hollow single-use needle, never a piercing gun. Piercing guns cannot be fully sterilised and crush cartilage tissue rather than puncturing it cleanly. Any studio offering cartilage piercings with a gun should be avoided entirely.
What happens on the day
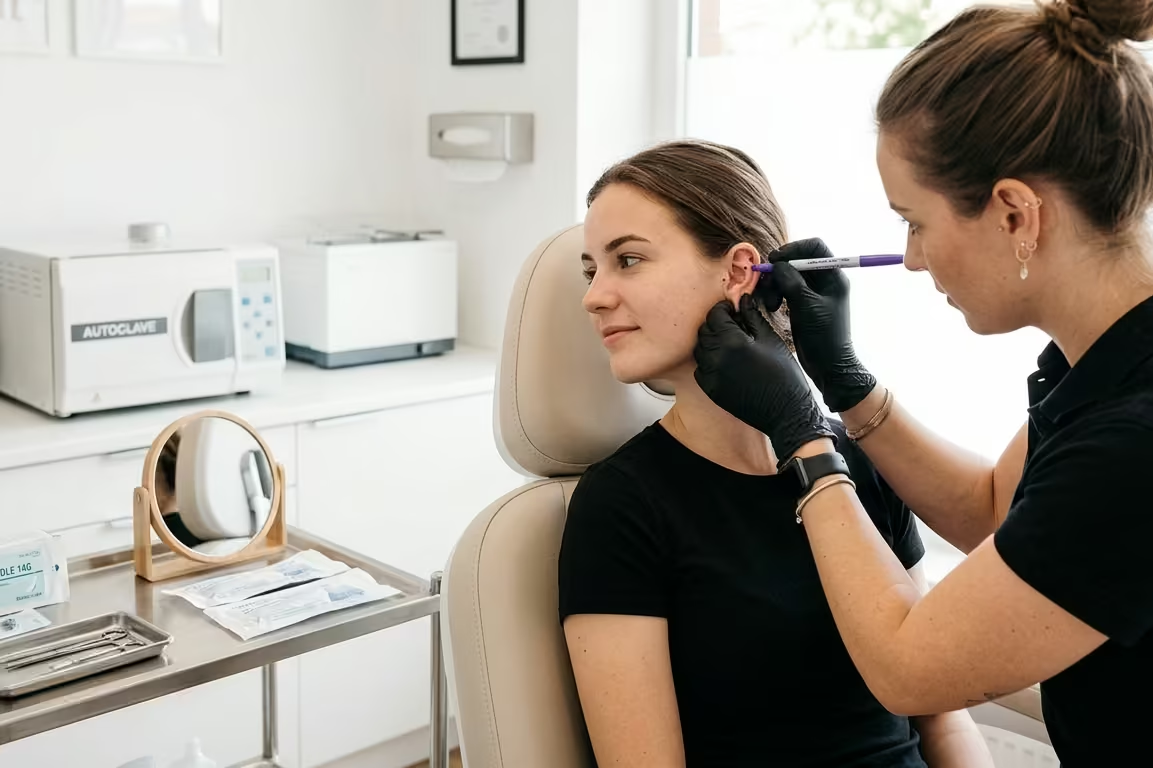
Your piercer will clean the ear thoroughly and mark the placement with a skin-safe pen. They will show you the mark in a mirror and confirm you are happy with the position before proceeding. This is the moment to ask for adjustments or raise any concerns.
The needle passes through the marked cartilage in one smooth, decisive motion. A flat-back labret stud is then inserted through the piercing channel. The whole procedure from marking to placement takes around five to ten minutes.
The sensation is a sharp pressure as the needle moves through cartilage, followed by a brief, deep ache that fades over the next hour. Many people are surprised that it is over more quickly than they anticipated.
Why needle technique matters
A clean, sharp single-use needle creates a precise circular channel through the cartilage. This gives the jewellery a clean, correctly sized channel to sit in. A dull needle, a slow technique, or multiple passes through the same spot creates a ragged channel that takes longer to heal and is more prone to complications.
Choosing an experienced piercer who works quickly and accurately is the single most impactful thing you can do to improve the quality of your helix piercing.
How Painful Is a Helix Piercing?
Most people rate a helix piercing at 4 to 6 out of 10. It is noticeably sharper than a lobe piercing because cartilage offers more resistance to the needle, but it is well within the manageable range for the vast majority of people.
The sensation is a focused pressure followed by a brief, deep ache. The ache fades within an hour for most people. The area remains sore to the touch for several days, particularly if accidentally bumped or slept on.
The forward helix tends to rate slightly higher, around 5 to 7, because the cartilage there is denser. Among the full range of ear cartilage piercings, the helix sits toward the lower end of the pain scale. The rook, snug, and industrial all rate higher. Our most painful ear piercings ranked guide covers every ear placement with honest pain ratings.
Healing: The Realistic Timeline
A helix piercing takes 6 to 12 months to fully heal. This is one of the most commonly misunderstood facts about cartilage piercings. Initial surface healing at the entry and exit points can appear complete in 8 to 12 weeks, but the cartilage beneath is still actively forming the fistula for many months after.
Treating a helix as healed at three months and switching to hoops or rings is one of the most reliable ways to trigger irritation bumps, extend the healing process by months, and end up frustrated with what should have been a straightforward experience.
Why cartilage heals slowly
Cartilage has a very limited blood supply compared to soft tissue. Blood vessels deliver the immune cells, nutrients, and oxygen needed to build new tissue around the jewellery. Fewer blood vessels mean slower healing, greater sensitivity to disturbance, and a longer period of vulnerability to irritation.
This is the biological reason behind every recommendation in Helix aftercare. Every suggestion, from not sleeping on the piercing to not rotating the jewellery, exists because of how cartilage responds to disruption.
Month by month
In the first four to six weeks, expect soreness, mild redness, and clear or whitish discharge around the jewellery ends. This is a normal healing activity. The piercing will be sensitive to pressure, touch, and contact with hair or clothing.
Over two to six months, tenderness gradually reduces. The piercing becomes less reactive to everyday disturbance. Discharge becomes minimal. The tissue is actively consolidating but remains in a healing state.
At six to twelve months, a well-cared-for helix is fully settled. The jewellery sits flat with no movement or resistance, the skin around it is clear, and the piercing is comfortable during normal daily activity.
❝ The most common helix piercing mistake is treating it as healed too soon. The 6 to 8 week initial healing period is when the skin closes over. The 6 to 12-month full healing period is when the cartilage stabilises. Both timelines matter.
Aftercare: What to Do Every Day
Helix aftercare has evolved significantly over the past decade. Several practices that used to be standard advice are now known to slow healing rather than help it.
What to do
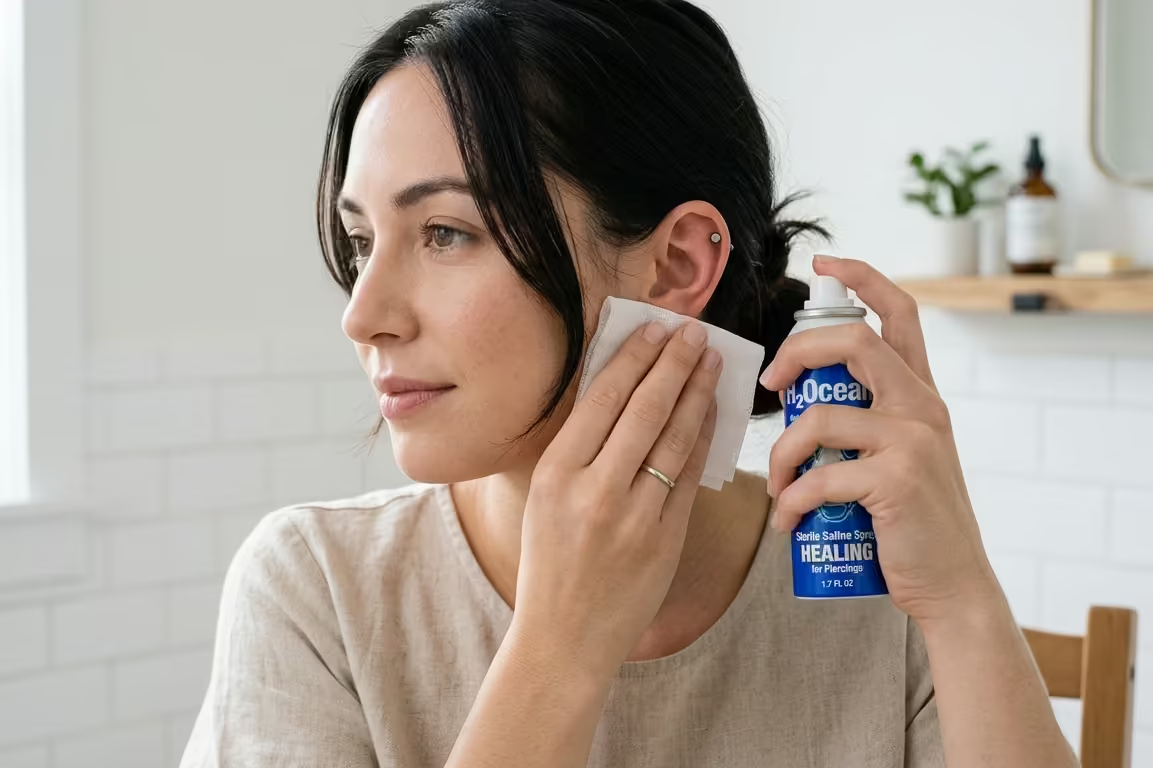
Clean the helix twice daily with sterile saline wound wash. Spray directly onto the front and back of the piercing, leave for thirty seconds, then rinse under clean running water in the shower. This is all the external cleaning the piercing needs.
Rinse the shower water over the piercing briefly at the end of every shower. This gentle rinsing removes any residue from the previous cleaning without creating the kind of chemical overload that some people inadvertently cause by using too many products.
What not to do
Do not rotate the jewellery. This was standard advice for decades and is now understood to be counterproductive. Rotating the jewellery tears the delicate tissue forming around it and introduces bacteria from the jewellery’s surface into the healing channel. Leave the jewellery completely still.
Do not use harsh products near the piercing. Alcohol, hydrogen peroxide, tea tree oil, and antibacterial soap are all too harsh for healing cartilage tissue. They kill bacteria but also damage the healing tissue they are applied to, slowing healing overall.
Do not use cotton wool. Fibres from cotton catch on the jewellery ends and introduce irritants to the healing tissue. Non-woven gauze or simple water rinsing is the safer alternative.
Sleeping position
Sleeping on the pierced ear applies direct pressure to the healing cartilage for hours at a time. This is one of the primary causes of prolonged healing and irritation bumps in helix piercings. A travel pillow worn around the neck during sleep keeps the head from rolling onto the pierced side.
The lifestyle adjustment feels significant for the first few weeks and then becomes second nature. The improvement in healing speed for people who consistently manage their sleep position is real and noticeable.
Hair and headphones
Long hair can wrap around the helix jewellery or drag across it during brushing and styling. Tying hair back during the early healing period significantly reduces accidental snagging. Hair products, including dry shampoo, hairspray, and styling products, should not come into contact with the healing piercing directly.
Over-ear headphones that press against the helix should be avoided during the healing process. Earbuds that sit in the ear canal are generally fine unless they contact the specific piercing site.
Irritation Bumps: Causes and Solutions
Irritation bumps are the most common problem with helix piercings. They are small raised areas that form around one or both ends of the jewellery. Understanding what causes them and how to resolve them saves weeks of unnecessary worry.
What they are
An irritation bump is a localised inflammatory response to ongoing mechanical stress on the healing tissue. It is not an infection. Infections are characterised by spreading redness, significant swelling, warmth, throbbing pain, and coloured discharge. Irritation bumps are localised, not spreading, and respond to improved care.
The most common causes
Sleeping on the piercing is the number one cause of irritation bumps on the helix. Hair snagging on the jewellery is the second most common. The third is jewellery that is too long for the healed anatomy and moves excessively. Changing jewellery too early is the fourth.
How to resolve them
Identify and remove the source of irritation first. Then return to consistent twice-daily saline cleaning and leave the piercing completely alone. Most irritation bumps resolve within two to four weeks once the irritant is addressed.
If a bump has been present for more than six weeks without improvement, book a check-in with your piercer. They can assess whether the jewellery needs downsizing, whether there is a placement issue, or whether a different approach is needed.
Helix Piercing Jewellery: A Complete Guide
The helix accepts a wider range of jewellery styles than most cartilage piercings. The key is understanding which styles are appropriate at each stage of the healing process.
Initial jewellery: flat-back labret stud
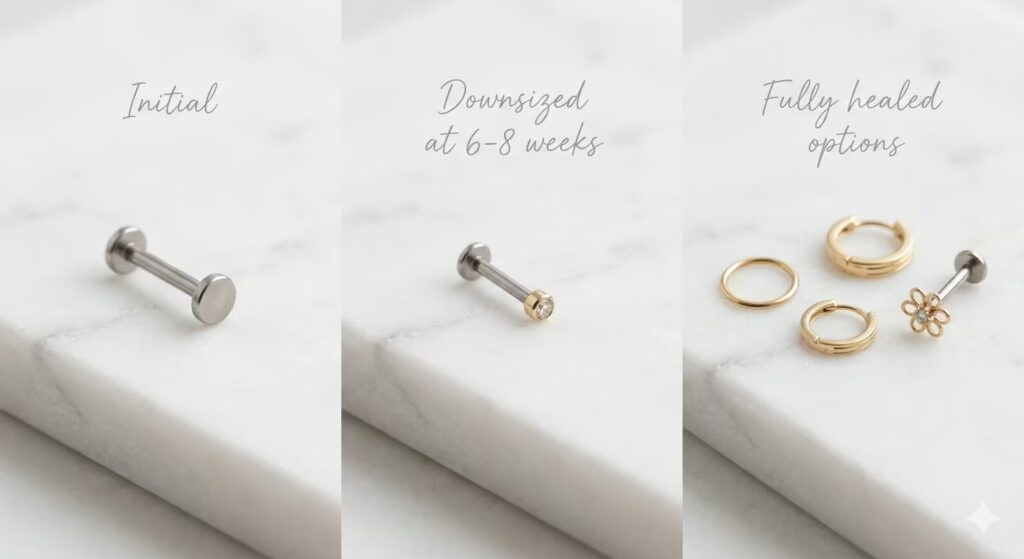
A flat-back labret stud in implant-grade titanium is the professional standard for a fresh helix piercing. The flat disc back sits flush against the inner side of the ear without creating pressure points. The post is slightly longer than the final jewellery to accommodate initial swelling.
Internally threaded or threadless flat-back studs are significantly better than externally threaded options. External threads are rougher and can damage the delicate healing tissue inside the piercing channel every time the jewellery is inserted or removed.
The downsize at six to eight weeks
Once initial swelling has fully settled, return to your piercer to replace the longer initial post with a correctly fitted shorter one. A bar that was right for a swollen fresh helix is too long for the healed tissue. Too much excess bar length creates unnecessary movement, catches on hair and clothing, and extends the healing process.
The downsize appointment typically costs $10 to $25. It is a required part of helix healing, not an optional extra. Budget for it from the start.
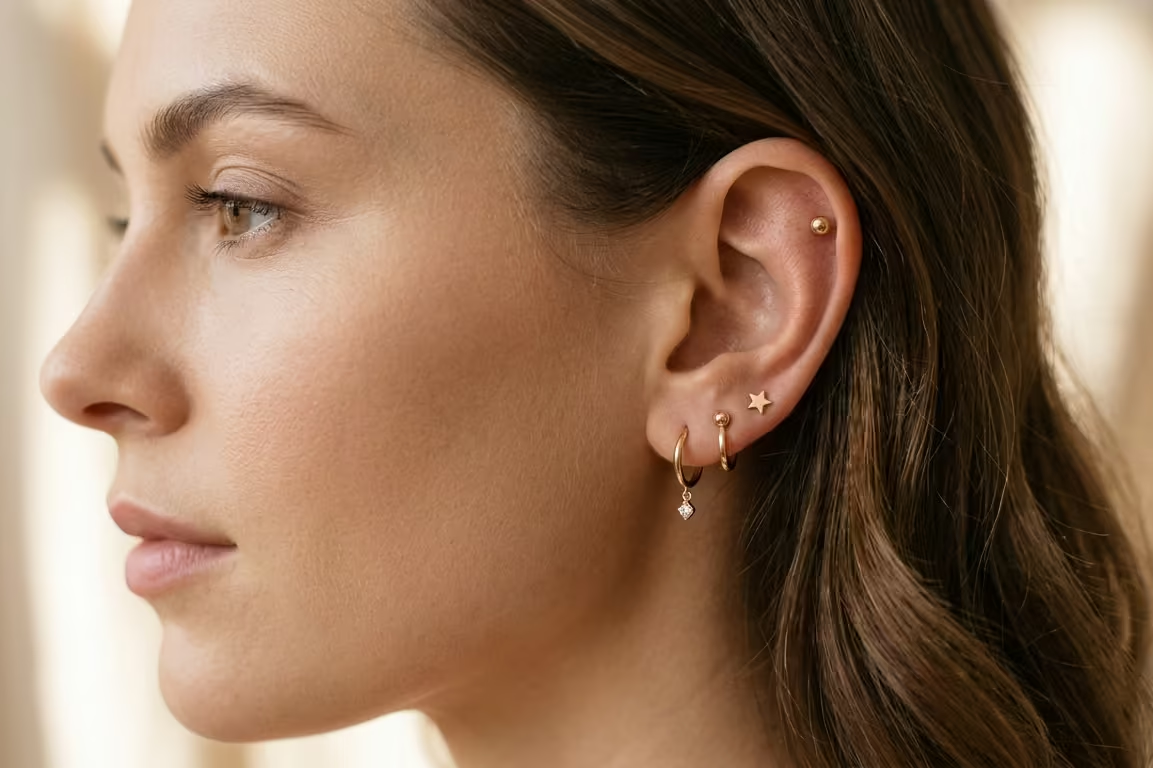
Once healed: expanding the options
At six to twelve months, when the helix is fully healed, hoops, huggie rings, seamless rings, clicker rings, and decorative flat-back studs all become viable. The helix is particularly popular for small gold hoops and delicate decorative stud designs in curated ear arrangements.
| Jewellery Style | Fresh Piercing | Healed Piercing | Key Notes |
| Flat-back titanium stud | Yes | Yes | Best choice at all stages. Internal threading preferred. |
| Seamless ring/hoop | No | Yes | Rotation during healing causes irritation. Wait for full healing. |
| Huggie ring | No | Yes | Very popular for healed helix. Close-fitting minimises movement. |
| Clicker ring | No | Yes | Easy insertion and removal. Wide range of decorative styles. |
| Gold (solid 14k/18k) | No | Yes | Premium long-term choice. Too heavy for fresh cartilage. |
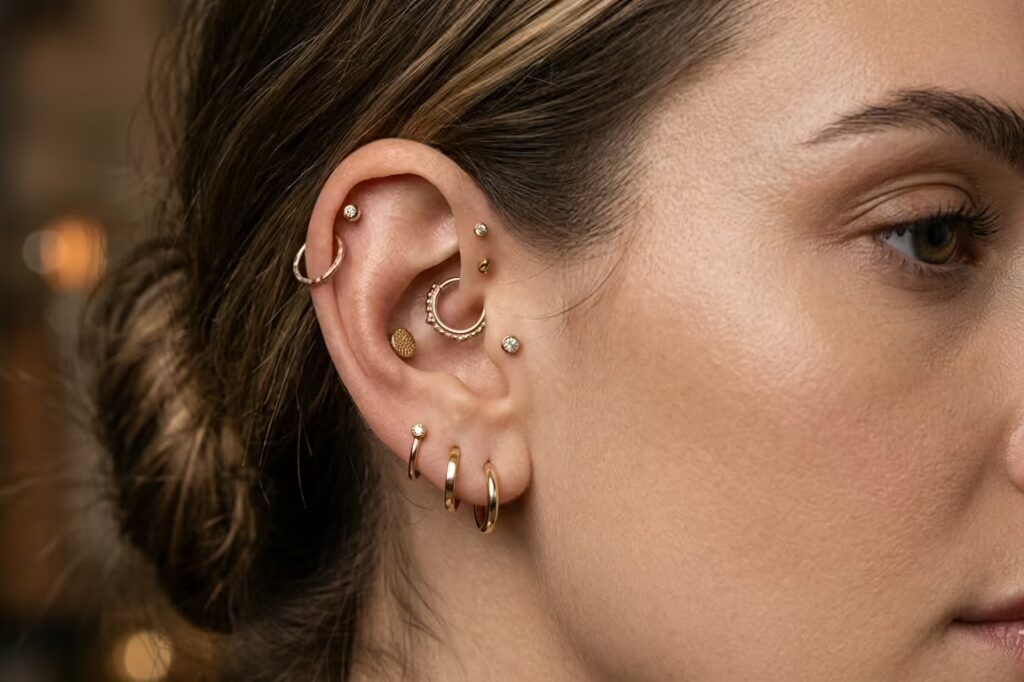
The Helix and the Curated Ear
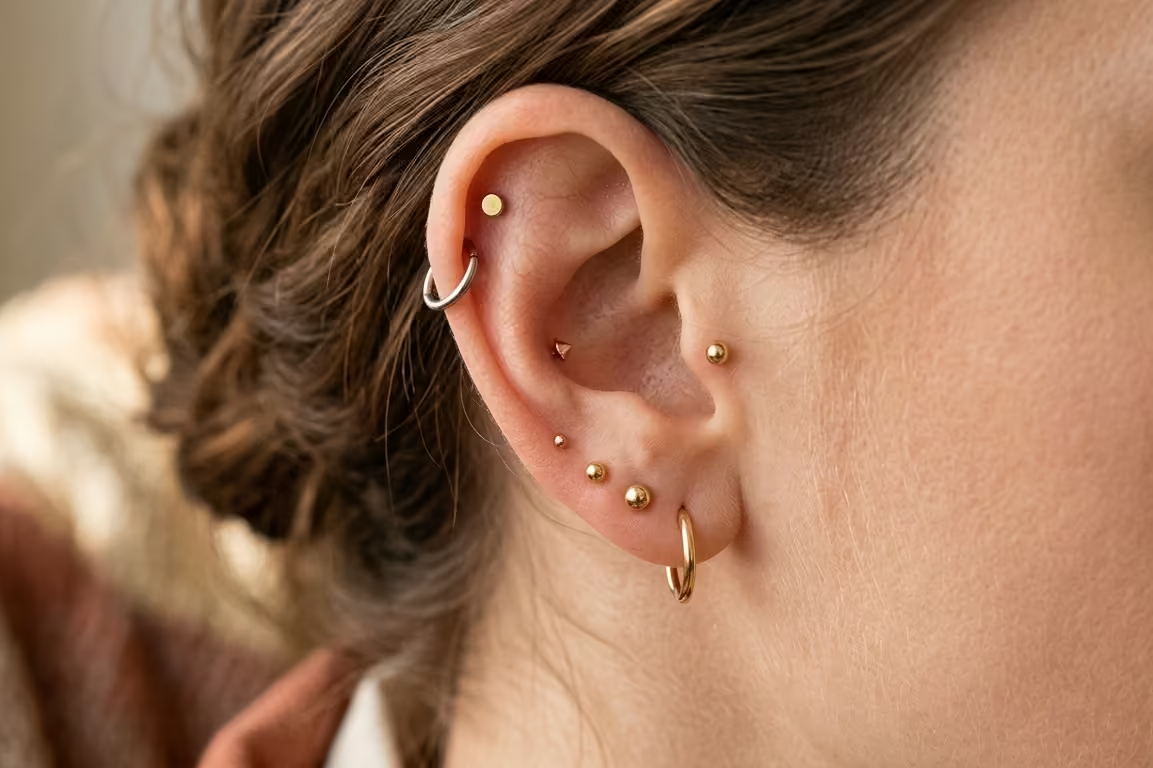
The helix piercing is the cornerstone of the curated ear trend. A curated ear is a deliberately designed arrangement of multiple piercings across the lobe and cartilage that are chosen to work together as a composition.
The helix tends to be the first cartilage piercing in a curated ear because it sits at the top of the ear’s visual hierarchy. The jewellery placed in the helix is seen from the greatest distance and in the most profile views. It sets the tone for everything below it.
For the full story of how ear piercing evolved into the modern curated ear aesthetic, see our article on the evolution of ear piercings: from ancient Egypt to modern trends. And for guidance on when you can safely add new piercings to a developing curated ear, our guide to when you can change your ear piercing covers the timing questions in detail.
Planning a curated ear around the helix
If you are starting a curated ear, get the helix first and let it fully heal before adding the next piercing. This gives you a settled, comfortable starting point and a clear visual anchor to plan around.
Most professional piercers will happily consult on a longer-term curated ear vision and advise on placement positions that will work harmoniously together. Booking a planning consultation before your first appointment is time very well spent.
Helix Piercing Pros and Cons
| Pros | Cons |
| Most versatile cartilage piercing for jewellery styles | A 6 to 12-month healing timeline requires patience |
| Lower pain rating than most other cartilage piercings | Sleeping position adjustment needed during healing |
| Natural starting point for curated ear building | Prone to irritation bumps if disturbed |
| Suits virtually all ear shapes and sizes | Hair and headphone management during healing |
| Strong portfolio of healed examples widely available | Cannot use hoops or rings until fully healed |
Frequently Asked Questions
Is a helix piercing the same as a cartilage piercing?
The helix is a type of cartilage piercing. Not all cartilage piercings are helix piercings. The term cartilage piercing is a broad category that includes the helix, forward helix, rook, daith, conch, tragus, industrial, and snug. The helix is simply the most popular and widely performed cartilage piercing within that broader category.
How do I know if my helix piercing is infected or just irritated?
Irritation presents as localised redness, small bumps around the jewellery ends, and manageable tenderness that improves with better aftercare. Infection presents as spreading redness that moves beyond the immediate piercing site, significant swelling, warmth, throbbing pain, and yellow or green discharge.
If you are unsure which you are experiencing, visit your piercer for an assessment before attempting any self-treatment. In cases of genuine infection, see a doctor. Do not remove the jewellery without professional advice, as this can trap infection beneath the skin.
Can I get a helix piercing if I wear glasses?
Yes, but check the position of your glasses frame arm against your ear before confirming the placement. Some frame styles sit close to the standard helix area. If this is the case for your frames, a small adjustment to the placement during your consultation can allow the piercing and the frame to coexist comfortably.
Will my helix piercing close if I take out the jewellery?
Fresh, recently healed helix piercings begin to close relatively quickly once jewellery is removed. A fully healed helix piercing that has been in place for several years may stay open for weeks to months without jewellery, but it will eventually close for most people.
If you need to remove the jewellery temporarily, do so for the shortest possible time and reinsert it as soon as you can. A PTFE or bioplastic retainer can maintain the channel while providing a less visible option during activities that require jewellery removal.
How much does a helix piercing cost?
A helix piercing at a reputable studio costs between $30 and $75 for the service fee, with implant-grade titanium jewellery adding $15 to $40. The realistic all-in cost, including aftercare and a tip, is $63 to $150. Our complete helix piercing cost guide covers pricing in detail across multiple countries, including Kenya, the US, UK, Australia, and Canada.
The Helix: Where Most Curated Ears Begin
The helix piercing is the ideal introduction to cartilage piercing for a reason. The placement is versatile. The jewellery options are the widest of any cartilage piercing. The pain is in the manageable range. And as a visual anchor for a curated ear, nothing else occupies the same position.
The commitment it asks for, six to twelve months of consistent aftercare, sleeping adjustments, and patience with the healing timeline, is the same commitment every cartilage piercing asks for. The helix just gives you one of the best returns on that investment.
Choose an experienced piercer with a strong portfolio of helix work. Start with a flat-back titanium stud. Get the downsize done in six to eight weeks. Keep hair back during healing. And let the piercing heal fully before you switch to the ring you have been waiting for. Do all of that, and your helix will be exactly what you hoped for when you first decided you wanted one.