The conch piercing has quietly become one of the most requested cartilage piercings in modern studios, and it isn’t hard to see why. It sits in the broad, shell-shaped bowl of the ear, giving it a bold presence without being loud and an elegance without being predictable. Whether finished with a single gold stud or wrapped with a sculpted hoop, a conch can anchor an entire curated ear or stand confidently on its own.
Beneath that aesthetic appeal, though, sits a genuine cartilage piercing, with all the planning, healing, and aftercare that cartilage demands. This guide walks you through everything you need to know before, during, and after the procedure, drawing on peer-reviewed research, guidance from the Association of Professional Piercers (APP), and the kind of practical detail you’ll only get from people who actually work on ears every day.
What Is a Conch Piercing?
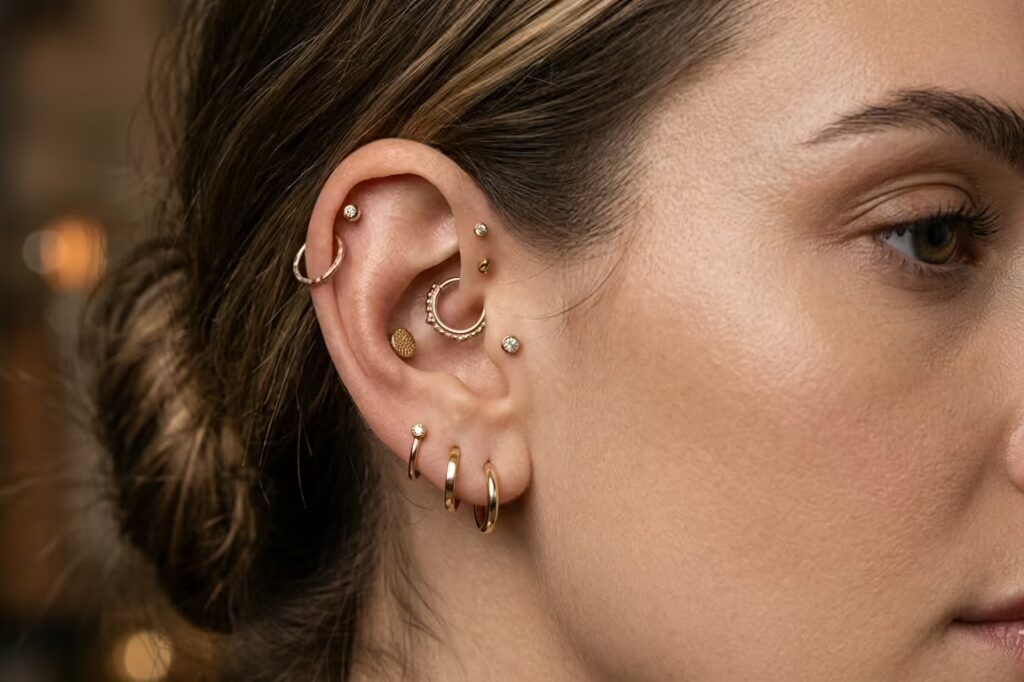
A conch piercing is a cartilage piercing placed in the large, concave bowl of the outer ear. The name comes from the anatomical term concha, the part of the ear shaped like a conch shell. The concha is the wide cartilage plate sitting between the ear canal and the outer rim, and it offers more usable real estate than almost any other spot on the ear, which is exactly why piercers and clients love working with it.
There are two main placements within the conch:
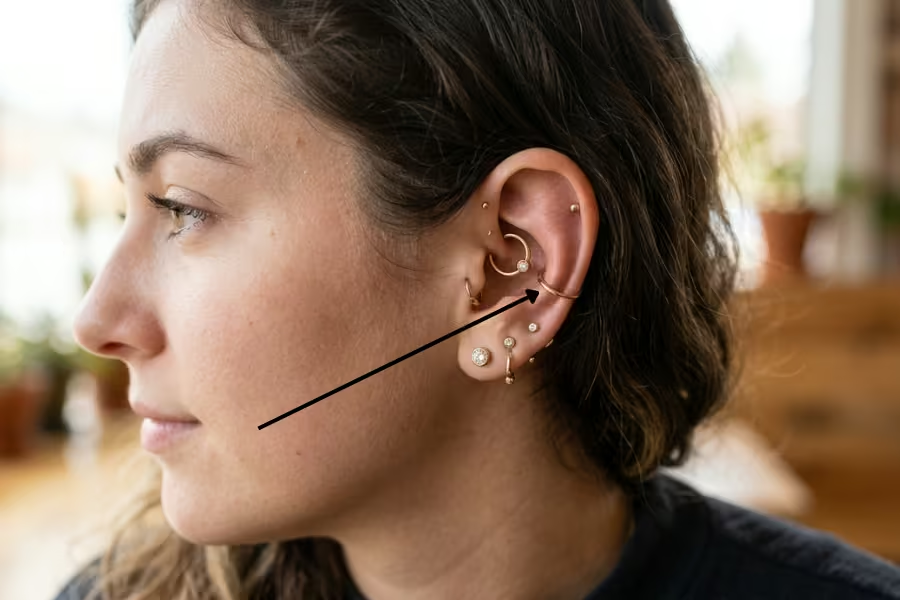
Inner conch. This sits in the deepest part of the ear bowl, closest to the ear canal, parallel to the daith (the small fold above the canal). It’s typically pierced with a flat-back stud or labret because there isn’t enough room for a hoop to sit naturally in this recessed area. The inner conch reads as a clean, centered focal point on the ear.
Outer conch. Placed along the flatter cartilage closer to the antihelix (the curved ridge running around the inside of the ear), the outer conch is the more flexible of the two. It can host a stud during healing and is often the placement of choice for people who eventually want to wear a large hoop that wraps around the outer edge of the ear.
Some people get both pierced together, sometimes joined with an orbital configuration where a single hoop passes through two holes. There’s also the contraconch (placed on the opposite ridge of the bowl) and the vertical conch, which goes through the cartilage at a different angle for a bar-on-bar look.
Conch Piercing Pain: What It Actually Feels Like
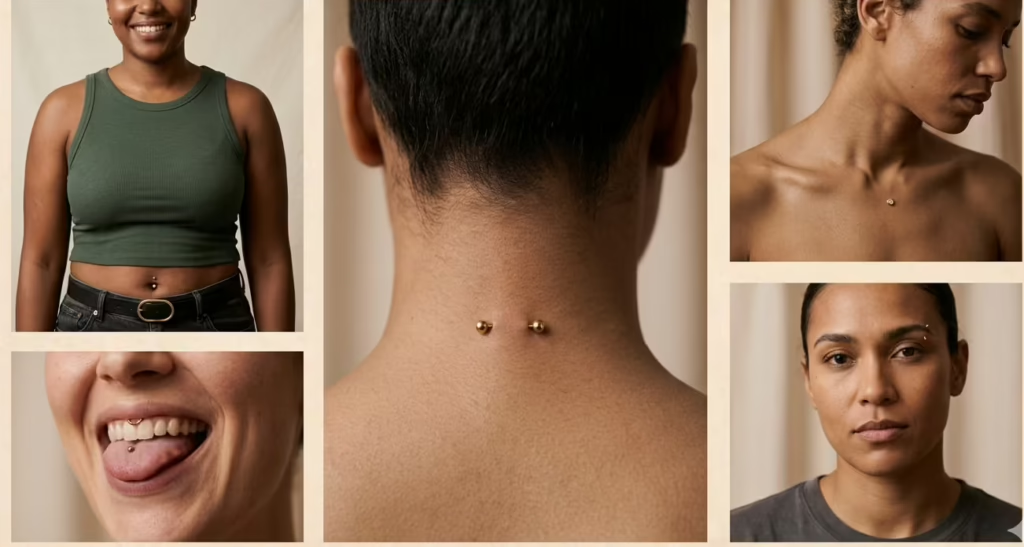
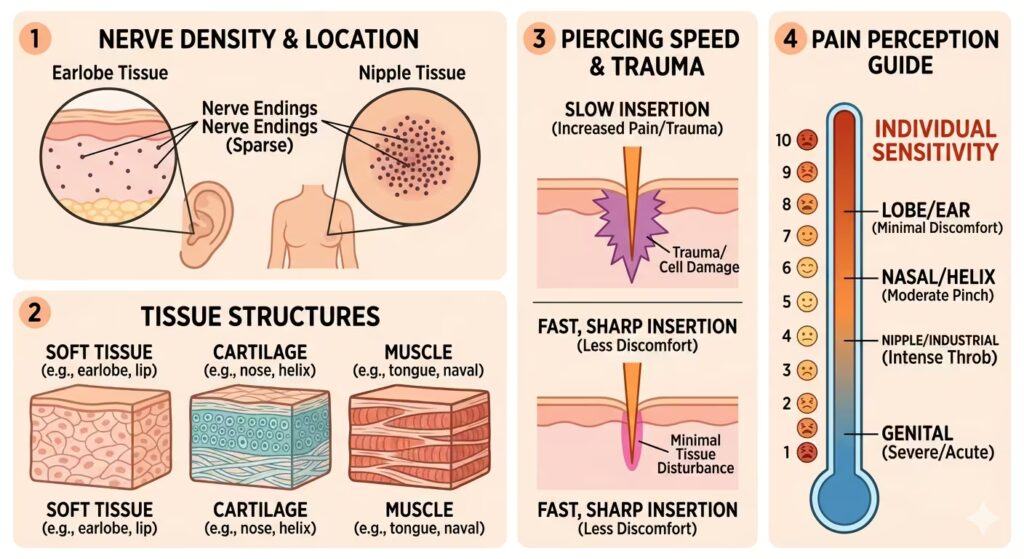
Cartilage is denser than the soft tissue of the lobe, and the conch sits in some of the thickest cartilage on the ear, so honest expectation-setting matters here. Most clients describe the piercing itself as a sharp, hot pinch followed by deep pressure, with the sensation peaking for a second or two and then fading quickly. On a 1–10 scale, the conch usually lands somewhere between a 5 and a 7, putting it firmly in the moderate range, more intense than a helix but well below piercings like the snug or industrial.

Three things shape how much it actually hurts you:
- The thickness of your cartilage. Some people have a thicker concha than others, which means the needle has more tissue to pass through.
- Your piercer’s technique. A skilled piercer using a sterile, hollow needle in one smooth, confident pass produces far less pain than a rushed or uncertain one. Piercing guns should never be used on cartilage; more on that below.
- Your physical state on the day. Going in dehydrated, sleep-deprived, hungover, or anxious will amplify everything. Eating a real meal beforehand helps stabilize blood sugar and reduces the chance of feeling dizzy or nauseated after the piercing.
After the initial puncture, expect tenderness, throbbing, and pressure for several days. Conch piercing will feel sore when you brush against it, sleep on it, or pull a sweater over your head, and that’s a normal part of cartilage healing rather than a sign that something has gone wrong.
Why Cartilage Heals Differently (and Slowly)
Understanding why cartilage takes so long to heal makes the rest of this guide make sense.
Cartilage has a very limited blood supply compared to soft tissue. The lobe is fed by a generous network of small vessels, which is why a lobe piercing settles within six to eight weeks. The concha, by contrast, is dense, avascular tissue that relies on diffusion from the surrounding perichondrium (the thin membrane covering the cartilage) for nutrients and immune defense. When you pierce through it, the body has to repair the wound essentially from the edges inward, and that takes time.
This is also why cartilage piercings carry a meaningfully higher complication rate than lobe piercings. A large cross-sectional study published in The Laryngoscope found that infection rates were significantly higher in cartilage piercings compared to lobule piercings (30% vs. 21%), with cartilage piercings showing 2.2 times higher odds of any complication when other variables were controlled for.
A separate study published in the Journal of Nature and Science of Medicine reported that the prevalence of probable piercing-related infection was 41.4% for cartilage piercings versus 29.6% for earlobe piercings. The reason, again, comes down to that limited blood supply. Once bacteria reach the avascular cartilage, the immune system has a harder time clearing them.
A systematic review in the same journal family, specifically examining transcartilaginous piercing infections, found that among 66 patients, infections from cartilage piercings led to ear deformity in a substantial portion of cases, with a mean patient age of 18.7 years and 87.5% female. The takeaway isn’t that you should be afraid of getting a conch piercing; it’s that the choice of piercer, jewelry, and aftercare actually matters far more than it does for a lobe.
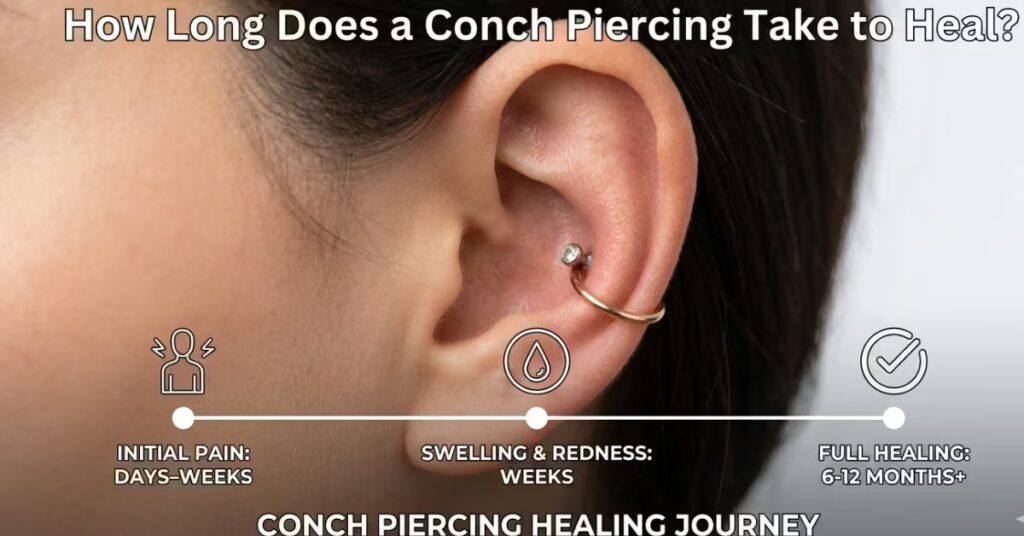
How Long Does a Conch Piercing Take to Heal?
The realistic healing window for a conch piercing is 6 to 12 months. Some people heal at the shorter end of that range, some at the longer end, and a few continue to feel mild internal sensitivity past the one-year mark. There’s no shortcut.
What you’ll typically experience:
- Days 1–7. Active inflammation. Expect throbbing, warmth, swelling, and a small amount of clear or pale yellow discharge that crusts around the jewelry. Light bleeding in the first 24 hours is normal. The piercing will feel sensitive to any pressure.
- Weeks 2–6. Swelling subsides, but the piercing is still actively forming new tissue. Crust formation continues. Most piercers recommend downsizing (switching to a shorter post) at the 6–8 week mark, once swelling has fully subsided, because long initial jewelry can snag, shift, and prolong healing if left in place.
- Months 2–6. The piercing looks visibly calm to the eye, but is still healing internally. This is the deceptive phase. Cartilage piercings heal from the outside in, so the skin surface can look completely closed while the channel itself remains fragile. Touching the jewelry, sleeping on it, or trying to swap it out during this period almost always causes a flare-up.
- Months 6–12. Final maturation. The internal channel firms up, and the tissue stabilizes around the jewelry. By the end of this window, most piercings are ready for a jewelry change.
The single biggest mistake people make is assuming the piercing is healed because it doesn’t hurt anymore. It isn’t, and changing the jewelry too early is a leading cause of bumps, infections, and prolonged healing.
Conch Piercing Procedure, Step by Step
Walking in knowing what’s about to happen takes a lot of the edge off. Here’s how a professional appointment typically runs:
- Consultation and anatomy check. Your piercer examines the shape and depth of your concha to confirm that the placement will sit well and accommodate the jewelry comfortably. Not every ear has the right anatomy for every conch variation, particularly the outer conch with a hoop, which needs enough flat surface for the ring to sit cleanly.
- Sterilization and prep. The piercer washes their hands, puts on fresh gloves, opens sterile single-use needles and jewelry from sealed autoclave packaging, and cleans the area with a medical-grade antiseptic.
- Marking. A small dot is placed where the piercing will go. You’ll be handed a mirror to confirm placement before anything is pierced. This step matters; don’t rush it.
- The piercing itself. A sterile, hollow piercing needle is passed through the cartilage in a single smooth motion. The jewelry is threaded through immediately behind the needle.
- Cleaning and aftercare briefing. The site is cleaned, you’re given written aftercare instructions, and the piercer goes over what to expect over the coming weeks.
The whole appointment usually takes 20 to 40 minutes, with the actual piercing taking a few seconds.
A non-negotiable note on technique: a conch piercing must be done with a sterile, hollow needle, never a piercing gun. Spring-loaded piercing guns crush cartilage rather than cleanly cutting through it, and research has shown this causes significantly more tissue trauma.
A study examining piercing damage on cadaver ears found that piercing guns, mainly used by jewelers to pierce the lobule, can give excessive cartilaginous damage, which is part of why guns are associated with higher rates of perichondritis (cartilage infection) than needles. Walk out of any studio that tries to use a gun on your ear.
Choosing Conch Piercing Jewelry: Why Material Matters More Than Style
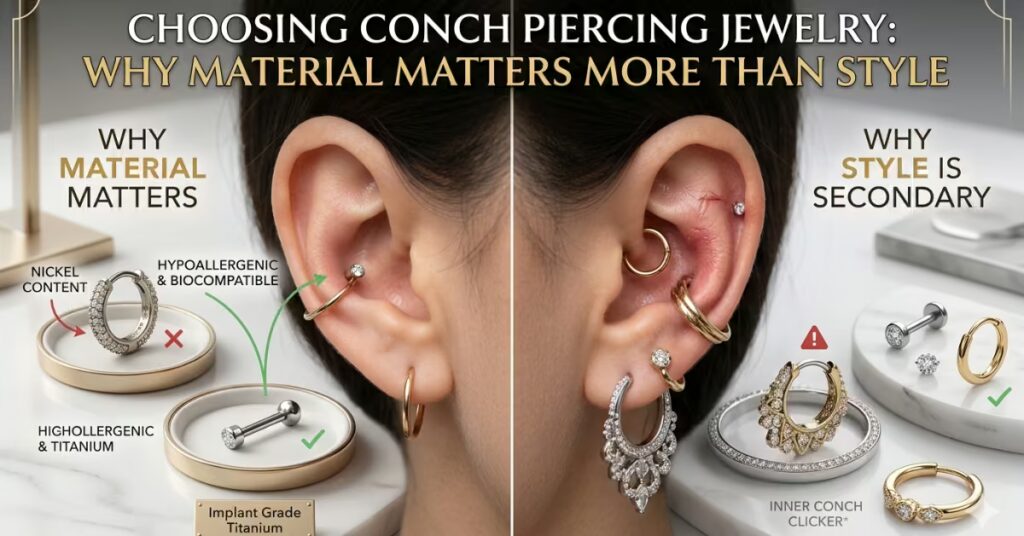
The material of your initial jewelry is one of the most underrated factors in how smoothly your piercing heals. Cheap jewelry can cause contact dermatitis, prolonged irritation, and embedding, all of which can scar a piercing for life.
- Implant-grade titanium (ASTM F136). The gold standard for fresh piercings. It’s the same titanium alloy used for surgical implants in the human body, specifically Ti-6Al-4V ELI (Extra Low Interstitial). The Association of Professional Piercers recommends implant-grade titanium (Ti6Al4V ELI) that is ASTM F-136-, ASTM F1295-, or ISO 5832-3-compliant, or commercially pure titanium (ASTM F-67-compliant). Titanium is lightweight, biocompatible, and effectively nickel-free, making it safe even for people with metal sensitivities.
- Implant-grade stainless steel (ASTM F138). Strong, durable, and widely used. The catch is that surgical-grade steel does contain nickel. 316L surgical steel contains 8–14% nickel, which can trigger reactions in people with sensitivities, so it’s a poor choice for fresh piercings if you’re nickel-sensitive. For people without sensitivities, ASTM F138 is a perfectly reasonable initial option.
- 14k or 18k solid gold (yellow or white). A premium choice for fresh piercings as long as it’s solid (never plated, filled, or vermeil). Solid gold below 14k can contain alloy metals that irritate healing tissue, and anything plated will eventually wear away, exposing the base metal underneath.
- Niobium. Less common but biocompatible and nickel-free. A solid backup if titanium isn’t available.
- What to avoid for a fresh piercing: sterling silver (oxidizes and stains the channel), gold-plated or gold-filled pieces, costume jewelry, and anything where the seller can’t tell you the material grade. Plastic and acrylic jewelry should also be avoided in fresh cartilage piercings; they’re porous and can trap bacteria.
Jewelry Styles for the Conch
For the initial piercing, almost every reputable piercer uses a flat-back labret stud. The flat disc sits flush against the back of the ear, the post sits straight through the cartilage, and a small decorative top (a gem, ball, or shape) finishes the front. This setup minimizes movement, snagging, and pressure on the healing channel.
Once fully healed (six to twelve months in), you can explore:
- Hoops and rings. Seamless rings, hinged segment rings, and clickers all work beautifully in an outer conch, often wrapping around the entire outer edge of the ear for a striking sculpted look. Inner conch placements rarely accommodate a hoop because the cartilage sits too recessed.
- Statement studs. Larger gems, clusters, ornate gold pieces, and three-dimensional designs all suit a healed conch.
- Curated combinations. A conch is often the anchor of a multi-piercing ear, paired with helix, tragus, lobe, or rook piercings for a layered effect.
Gauge for a conch is typically 16 gauge (1.2 mm), sometimes 14 gauge (1.6 mm), depending on the piercer’s preference and the jewelry style.
Conch Piercing Aftercare: What Actually Works (and What Doesn’t)
Aftercare for cartilage piercings has gotten simpler over the past decade, not more complicated. The current best-practice consensus, in line with the Association of Professional Piercers’ guidance, is to spray with sterile saline as a wound wash while healing, with moving or rotating jewelry being unnecessary and potentially irritating.
What to Do
- Wash your hands thoroughly before touching the piercing. This is the single most important step. Most cartilage infections come from dirty hands, not from the piercing process itself.
- Spray with sterile saline twice a day. Use a saline wound wash that lists 0.9% sodium chloride as the only ingredient. The APP specifically notes that your saline ingredients should list 0.9% sodium chloride as the only ingredient, with additives like moisturizers and antibacterials avoided, as well as similar sounding products like contact lens saline, nasal spray, or eye drops. NeilMed Wound Wash and H2Ocean are commonly recommended brands.
- Pat dry with clean disposable paper products. Cloth towels harbor bacteria and snag on jewelry.
- Sleep with the piercing facing up. Pressure during sleep is one of the leading causes of conch piercing problems, including angle migration and irritation bumps. A travel pillow with the ear placed in the central hole is the workaround most piercers recommend.
- Be patient with the timeline. Don’t change jewelry, don’t twist it, don’t remove it to “see how it looks,” and don’t compare your healing to anyone else’s.
What Not to Do
- Don’t clean with alcohol, hydrogen peroxide, antibacterial soap, Neosporin, Bactine, or tea tree oil. All of these damage healing tissue. They were standard advice a generation ago, but are now actively discouraged by professional bodies.
- Don’t sleep on the piercing. The pressure compresses the channel, shifts the jewelry’s angle, and triggers irritation bumps.
- Don’t wear in-ear headphones or earbuds. They press directly on the conch, trapping moisture and bacteria. Switch to over-ear headphones for the duration of the healing process, ideally with a soft pad that doesn’t rest heavily on the piercing site.
- Don’t submerge the piercing in pools, hot tubs, lakes, or oceans. A 2001 outbreak investigation linked cartilage-piercing infections to Pseudomonas aeruginosa contamination. The study found that risk factors for infection included piercing location and the use of a contaminated aftercare solution, and Pseudomonas aeruginosa was identified as the causative organism. Pseudomonas thrives in standing water and can cause severe perichondritis that may require IV antibiotics.
- Don’t change the jewelry early. Even if you’re tired of the initial stud, wait. Switching jewelry before the channel is fully formed is one of the most common causes of long-term complications with piercings.
- Don’t apply makeup, hair products, perfumes, or lotions near the piercing. Hair dye and bleach in particular are aggressive irritants.
Recognizing Irritation vs. Infection in Conch Piercing
This distinction trips up almost everyone with a cartilage piercing, and getting it wrong in either direction (panicking unnecessarily, or ignoring real warning signs) can hurt the outcome.
- Irritation looks like: mild redness around the piercing, occasional clear or pale yellow crusting, intermittent tenderness, a small bump alongside the piercing, and mild itching. This is normal during healing and usually resolves with consistent saline rinses and removing whatever is irritating it (usually pressure from sleeping or hair products).
- Infection looks like: spreading redness or red streaks moving away from the piercing, hot skin around the site, persistent or worsening pain, thick yellow or green pus (not the pale yellow lymph that crusts on jewelry), swelling that worsens rather than improves, fever or chills. If you see any of these, contact your piercer for an assessment and a doctor if the symptoms are systemic (fever, spreading redness) or if the local symptoms worsen over 48 hours.
A specific complication unique to cartilage piercings is perichondritis, an infection of the perichondrium that surrounds the cartilage. It can cause significant ear deformity if left untreated, which is why cartilage piercing infections should be taken seriously and not left to run their course. Among 15 confirmed cases in one outbreak study, nine (60%) were hospitalized for a median of 4.4 days and required intravenous or oral antibiotics, with some cases requiring surgical treatment and multiple antibiotics.
Bumps, Keloids, and Scarring
Cartilage piercings are prone to small bumps that appear next to the piercing, and almost all of them fall into one of three categories:
- Irritation bumps. Small, fluid-filled, soft to the touch, and usually a response to physical pressure or jewelry that’s the wrong fit. These resolve when the source of irritation is removed.
- Hypertrophic scars. Raised, firm tissue right at the piercing site, often pinkish. They form when the body produces too much collagen during healing. They can shrink over time with patience and consistent aftercare.
- True keloids. Rare, but possible. Keloids are aggressive overgrowths of scar tissue that extend beyond the original wound and continue to grow. They have a genetic component; if you or close family members keloid easily, talk to your piercer before booking. True keloids usually require dermatologic treatment.
The first instinct for most people is to apply tea tree oil or pop the bump. Don’t. Tea tree oil is harsh on healing tissue, and squeezing a bump is more likely to spread inflammation than resolve it. The sustainable fix is to identify what’s causing the irritation (sleep pressure, jewelry that’s too long, metal sensitivity, hair products) and remove it.
Does a Conch Piercing Help With Headaches or Migraines?
You’ll see this claim everywhere, often anchored to acupuncture meridian theory and the idea that the conch sits over a pressure point related to head pain. The honest answer is that there isn’t credible evidence to support it.
The closest research touches on the daith piercing rather than the conch. A case report in the journal Headache & Pain discussing a 54-year-old chronic migraine sufferer noted that daith piercing cannot be recommended as migraine treatment because of the lack of scientific evidence, the unquantified rate of failure, and the associated risks with insertion.
The American Migraine Foundation is more direct, stating that while some people with migraine say they have experienced relief from their symptoms after getting a daith piercing, the only evidence that supports this is purely anecdotal, and there is no research that supports this theory. The foundation attributes most reported relief to placebo response and explicitly does not recommend the practice.
If you want a conch piercing, get it for the look. Any pain relief that follows should be considered a happy coincidence rather than the reason for the procedure.
Conch Piercing Cost
Conch piercing pricing varies by region and studio reputation, but a useful baseline: studio fees typically range from $30 to $80, with quality jewelry adding $20 to $200+, depending on material and design. Solid gold pieces and gem-set titanium will sit at the higher end. A reasonable total for a properly done conch with implant-grade titanium at a reputable studio is around $60 to $150.
Cheaper isn’t better here. The price difference between a $20 mall piercing and a $100 studio piercing is the difference between a piercing gun, mystery-grade jewelry, and a ten-minute appointment, and a sterile needle, certified implant-grade jewelry, and a properly trained piercer who knows your anatomy. The downstream costs of a botched cartilage piercing (infection treatment, scar revision, replacement jewelry, and having to repierce after letting one close) far exceed the upfront savings.
How to Choose a Piercer
The single biggest predictor of a smooth healing experience is who pierces you. Look for:
- APP membership or equivalent. The Association of Professional Piercers maintains a directory of piercers who meet specific training, sterilization, and jewelry standards. Their member locator at safepiercing.org is the easiest place to start.
- Sterile, single-use needles only. No piercing guns. Ever.
- Implant-grade jewelry on hand. Ask what material they pierce with and whether they can show you a mill certificate confirming the grade. Reputable studios will not be offended by this question.
- A clean, professional studio. Dedicated piercing rooms, autoclaves visible, bloodborne pathogen training certificates posted.
- Honest anatomy assessment. A good piercer will tell you when your anatomy isn’t suited to a particular placement rather than pierce anyway and let you deal with the consequences.
Conch Piercing FAQs
- Can I get a hoop in my conch right away? No. Hoops cause too much movement during the healing process. Almost all piercers will start you with a flat-back stud and let you switch to a hoop after the piercing has healed (six to twelve months).
- How long until I can sleep on it? Realistically, six to nine months for most people, though some take a full year. Even a quick accidental press during sleep can cause a flare-up well into the healing process.
- Can I exercise after getting it pierced? Light exercise is fine after 24 to 48 hours, but avoid anything that causes heavy sweating directly into the piercing for the first week or two. Sweat irritates a fresh wound. Wipe gently with saline after workouts.
- Can I fly with a fresh conch piercing? Yes. Cabin pressure doesn’t affect piercings. Just keep your hands clean and don’t sleep against the airplane wall on that side.
- What if my piercing rejects? Conch piercings have low rejection rates compared to surface piercings because they go through fully developed cartilage. If migration is happening, it’s usually due to jewelry that’s too short, sleeping pressure, or repeated trauma rather than true rejection.
- Can I get pregnant/have surgery with a conch piercing? Yes, though for surgery, you may need to temporarily remove or swap the jewelry. If you must remove it before the piercing is healed, see your piercer for a non-metallic retainer rather than letting the channel close.
The Bottom Line
A conch piercing rewards patience. It heals slowly, it doesn’t tolerate corner-cutting, and it punishes cheap jewelry and rough aftercare more than almost any other ear piercing. But done correctly, with implant-grade jewelry, a skilled piercer, and a calm aftercare routine, it sits beautifully on the ear for the rest of your life and supports an enormous range of jewelry styles as your taste evolves.
The work is mostly in the first six months. Spray your saline twice a day, leave the jewelry alone, sleep on the other side, skip the earbuds, and check in with your piercer if anything feels off. Past that point, you have a centerpiece piercing that almost everything else on the ear is designed to complement.
Sources
- Ziegler, A., et al. “Ear Piercing Complications: Comparing Cartilage and Soft Tissue Piercings in a Large Survey Cohort.” The Laryngoscope, Wiley Online Library.
- Sosin, M., et al. “Transcartilaginous ear piercing and infectious complications: a systematic review and critical analysis of outcomes.” PubMed, NCBI.
- Alharbi, W. K., et al. “Cartilage Ear Piercing Probable Infections among Females in Riyadh, Saudi Arabia.” Journal of Nature and Science of Medicine.
- Keene, W. E., et al. “Outbreak of Pseudomonas aeruginosa Infections Caused by Commercial Piercing of Upper Ear Cartilage.” JAMA.
- Simplot, T. C., & Hoffman, H. T. “Comparison between cartilage and soft tissue ear piercing complications.” American Journal of Otolaryngology.
- Association of Professional Piercers. “Aftercare Guidelines.” safepiercing.org.
- Association of Professional Piercers. “Body Piercing Aftercare Information,” 2021 Edition.
- American Migraine Foundation. “Daith Piercings as Migraine Treatment.”
- Cascio, F., et al. “Daith Piercing in a Case of Chronic Migraine: A Possible Vagal Modulation.” NCBI PMC.
- ASTM International. “F136-13(2021)e1 Standard Specification for Wrought Titanium-6Aluminum-4Vanadium ELI (Extra Low Interstitial) Alloy for Surgical Implant Applications.”
- Cleveland Clinic. “Infected Ear Piercing: Symptoms, Treatment & Prevention.”
- Medical News Today. “Conch piercings: Procedure, aftercare, and more.”